

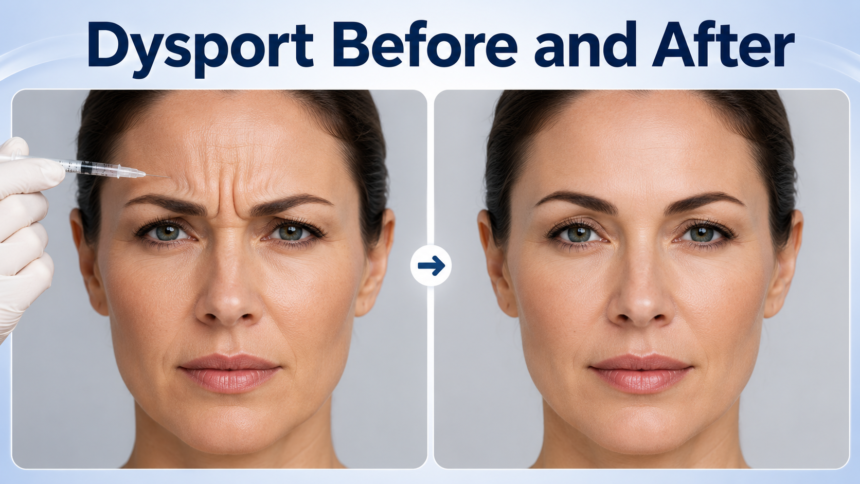
Many people considering injectable treatments want to know exactly what changes to expect once the procedure is done. Looking at Dysport before and after results gives a realistic picture of how frown lines, forehead creases, and crow’s feet respond to treatment over time.
This guide walks through the entire process, from the first consultation to the final results, using simple language so you can make an informed decision. Instead of relying on guesswork, you will learn the actual timeline, the factors that influence outcomes, and the aftercare steps that help results last longer.
Understanding Dysport
Dysport is an injectable treatment made from botulinum toxin type A, the same broad category of ingredient used in similar facial rejuvenation products. It works by temporarily relaxing the muscles responsible for repeated facial movements that cause wrinkles over time.
What Dysport Is Made Of?
Dysport contains a purified form of botulinum toxin type A that has been used safely in cosmetic and medical settings for many years. The formulation is designed to spread slightly more than some other similar products, which some injectors prefer for larger treatment areas like the forehead. This ingredient works directly on nerve signals sent to muscles.
How Dysport Works on Facial Muscles?
Once injected, Dysport blocks the nerve signals that tell specific muscles to contract. When those muscles stop tightening repeatedly, the skin above them gradually smooths out because it is no longer being folded by constant movement. This is why expression lines, rather than static wrinkles caused by sun damage, respond so well to this treatment.
Dysport Versus Similar Treatments
Dysport is often compared to other botulinum toxin products on the market. While they share a similar mechanism, differences exist in dosing units, onset speed, and how the product spreads once injected. Some patients notice Dysport works slightly faster, while formulation strength and unit conversion vary between brands.
Approved and Off-Label Uses
Dysport is officially approved for treating moderate to severe frown lines between the eyebrows in adults. Beyond this approved use, many injectors also use it off-label for forehead lines, crow’s feet, and other expression-related wrinkles, based on clinical experience and patient needs.
Areas Commonly Treated With Dysport
Dysport is not limited to just one part of the face. It is commonly used across several areas where repeated muscle movement causes visible lines, and each area responds slightly differently based on muscle strength and skin thickness.
Glabellar Lines
The vertical lines that form between the eyebrows, often called frown lines or elevens, are the primary approved treatment area for Dysport. These lines usually respond very well because the muscles in this region are strong and react predictably to treatment.
Forehead Lines
Horizontal lines across the forehead form from raising the eyebrows repeatedly. Dysport treatment in this area requires careful dosing since too much relaxation can cause a heavy or unnatural brow position, so experienced injectors adjust placement carefully.
Crow’s Feet
The fine lines that appear at the outer corners of the eyes when smiling or squinting are another popular treatment area. Because the skin here is thinner, results often appear smoother and more natural compared to thicker skin areas.
Other Off-Label Treatment Areas
Some injectors also use Dysport for bunny lines on the nose, jawline slimming, neck bands, and a subtle lip flip effect. These uses depend heavily on the practitioner’s experience and are not part of the official approved indications.
Before Treatment: What to Expect?
Preparing properly for treatment plays a large role in how smooth the process feels and how satisfied you are with the outcome. A proper consultation sets the foundation for realistic results.
The Consultation Process
During the first visit, the injector examines your facial muscles, skin condition, and the specific lines you want treated. This conversation also covers your medical history and any previous cosmetic treatments to ensure Dysport is a suitable option for you.
Assessing Candidacy
Not everyone is an ideal candidate right away. Individuals with certain neuromuscular conditions, active skin infections in the treatment area, or known allergies to the ingredients may need to explore alternative options instead.
Pre-Treatment Instructions
Patients are usually advised to avoid blood-thinning medications, alcohol, and certain supplements for a short period before treatment. This reduces the chances of bruising and helps the injection process go more smoothly.
Setting Realistic Expectations
A good injector will explain that Dysport softens and reduces wrinkles rather than erasing them completely, especially for deep-set lines that have existed for years. Understanding this beforehand prevents disappointment after treatment.
Taking Before Photos
Clear photos taken at rest and while making expressions like frowning or raising eyebrows are essential. These images become the true reference point for comparing Dysport before and after results once the treatment has fully settled.
The Treatment Process
The actual injection appointment is typically quick and requires minimal downtime, which is one of the main reasons this treatment remains popular among busy individuals.
How the Injection Works?
Using a very fine needle, the injector places small amounts of Dysport into specific muscle groups based on the treatment plan discussed during consultation. The entire process for common areas usually takes only a few minutes.
Pain Level and Appointment Duration
Most people describe the sensation as a quick pinch rather than significant pain. The full appointment, including preparation and aftercare instructions, generally takes between fifteen and thirty minutes from start to finish.
Units Used Per Area
The number of units required depends on muscle strength and the size of the treatment area. Below is a general reference table showing typical ranges, though actual amounts vary by individual and provider assessment.
| Treatment Area | Typical Unit Range |
| Glabellar lines (frown lines) | 50 to 60 units |
| Forehead lines | 40 to 50 units |
| Crow’s feet (both sides) | 30 to 40 units |
Immediate Appearance After Injection
Right after treatment, small red bumps at injection sites are normal and usually fade within thirty to sixty minutes. The face will look essentially the same as before treatment since the muscle-relaxing effect has not started working yet.
Dysport Results Timeline
Understanding the timeline is one of the most helpful parts of comparing Dysport before and after outcomes, since results do not appear instantly.
Day One to Two
During this early window, most patients notice no visible difference yet. The active ingredient is still beginning to interact with the targeted nerve endings beneath the skin.
Day Three to Five
This is typically when the first signs of muscle relaxation begin appearing. Lines start to look slightly softer, particularly when the face is at rest rather than during strong expressions.
Day Seven to Fourteen
By this stage, most people see the full intended effect settle into place. This period is considered the most accurate time to take official after photos for comparison purposes.
Week Four and Beyond
Results generally remain stable and consistent through this stage, with smooth, natural-looking muscle relaxation visible across the treated areas during both rest and expression.
Month Three to Four
As the effect gradually wears off, muscle movement slowly returns and lines may begin reappearing. This is the typical window when many patients schedule a follow-up session to maintain results.
Before and After Photo Comparisons Explained
Photo comparisons are the clearest way to visualize how treatment changes the appearance of specific facial areas over time.
Glabellar Line Comparison
Before treatment, frowning typically creates deep vertical grooves between the eyebrows. After treatment, the same expression shows significantly reduced movement, and the lines appear noticeably softer even during a strong frown.
Forehead Line Comparison
Raising the eyebrows before treatment usually reveals several horizontal creases across the forehead. Afterward, the forehead appears smoother during the same motion, though a small amount of natural movement is often preserved intentionally.
Crow’s Feet Comparison
Smiling before treatment often shows fine radiating lines near the outer eye corners. Following treatment, these lines soften considerably, giving the eye area a more relaxed and refreshed appearance without changing the natural smile.
Rest Versus Animation Photos
Photos taken while the face is completely still typically show fewer initial differences, since static wrinkles are less affected by muscle relaxation. Animated photos, taken while frowning or smiling, show the most dramatic before and after contrast.
Factors That Affect Results
Results are not identical for everyone, and several personal factors influence how visible the change appears.
Age and Skin Elasticity
Younger skin with better elasticity tends to smooth out more completely once the underlying muscle relaxes, while older skin with existing static wrinkles may show more moderate improvement.
Muscle Strength and Anatomy
Individuals with naturally stronger facial muscles may require higher doses to achieve the same level of relaxation compared to those with lighter muscle activity in the treated area.
Dosage and Injector Skill
The precision of unit placement significantly affects how natural the final result looks. Experienced injectors adjust technique based on facial anatomy rather than applying a fixed formula to every patient.
Skin Type and Metabolism
Some individuals naturally metabolize the treatment faster than others, which can shorten how long the results last. This varies from person to person and cannot always be predicted beforehand.
Lifestyle Factors
Habits such as frequent sun exposure and smoking can affect overall skin quality, which indirectly influences how smooth the treated area appears even after successful muscle relaxation.
Aftercare Tips for Best Results
Proper aftercare directly influences how well the treatment settles and how long the results remain visible.
Do’s and Don’ts After Treatment
Patients are generally advised to avoid touching or massaging the treated area for several hours, as this can cause the product to shift into unintended muscles and affect results.
Activities to Avoid
Strenuous exercise, excessive heat exposure such as saunas, and lying flat for extended periods shortly after treatment are typically discouraged for the first day to support proper settling.
Prolonging Results
Maintaining good skin care, staying hydrated, and protecting skin from sun damage can help the overall appearance stay refreshed for longer, even as the treatment itself naturally wears off.
Scheduling Follow-Up Sessions
Most providers recommend booking touch-up appointments before the effect completely fades, which helps maintain consistent muscle relaxation rather than allowing lines to fully return before starting again.
Potential Side Effects and Risks
Like any injectable treatment, Dysport carries some possible side effects that patients should be aware of beforehand.
Common Mild Side Effects
Temporary bruising, mild swelling, redness at injection sites, and slight headache are among the most commonly reported reactions, typically resolving within a few days without additional treatment.
Rare But Serious Risks
In rare cases, effects such as drooping eyelids, difficulty swallowing, or unwanted spread to nearby muscles have been reported. These situations require prompt medical attention if they occur.
Minimizing Risks
Choosing a qualified, experienced injector and following all pre- and post-treatment instructions significantly reduces the likelihood of complications arising from the procedure.
When to Contact Your Doctor
Any unusual symptoms such as severe swelling, difficulty breathing, or vision changes following treatment should be reported to a medical professional immediately rather than waiting to see if they resolve.
Cost Considerations
Understanding pricing helps set realistic budget expectations before booking a treatment session.
Average Cost Per Session
Pricing is typically calculated per unit, and total cost depends on how many units are needed for the desired treatment areas, which varies based on individual muscle strength.
Factors Influencing Price
Geographic location, provider experience, clinic reputation, and the number of areas treated in a single session all contribute to the final cost a patient can expect to pay.
Cost Comparison With Similar Treatments
While pricing structures differ slightly between botulinum toxin brands due to unit conversion differences, overall treatment costs across similar products tend to fall within a comparable range for equivalent results.
Frequently Asked Questions
How long do Dysport results typically last? Results generally last around three to four months before muscle movement gradually returns to its previous level.
Is Dysport better than other similar treatments? Neither option is universally better, as effectiveness depends on individual anatomy, injector technique, and personal preference regarding onset speed and spread.
Does the injection process hurt? Most patients describe only mild, brief discomfort similar to a quick pinch rather than significant pain during the procedure.
Can results end up looking unnatural? When administered by an experienced provider using appropriate dosing, results typically look smooth and natural rather than frozen or overdone.
How soon will I see visible changes? Initial changes usually begin appearing around day three, with full results typically visible by day seven to fourteen.
Conclusion
Reviewing real Dysport before and after outcomes shows that this treatment offers a predictable, gradual improvement in expression lines when performed by a qualified provider.
Results depend on individual factors like muscle strength, skin quality, and injector technique, but most patients see smoother, more relaxed skin within one to two weeks that lasts several months. Choosing an experienced professional and following proper aftercare remain the most important steps toward achieving safe, natural-looking results.
RELATED ARTICLES
How to Straighten Toes Naturally: Safe Exercises, Tools
KLOW Peptide Benefits: Recovery, Skin & Gut Health Explained
How Long After Fluoride Treatment Can I Eat?
Curodont: The Complete Guide to Peptide-Based Enamel Repair
Tooth and Ear Pain on the Same Side: Causes, Symptoms, and Treatment